Playing with ADS-B signals
So I finally got my dongle.
It just started as I played with air traffic data I am not supposed to have, and it just did not plot well around airports. The idea was, as part of the student project I mentor, to have students plot the takeoff and approach/landing pathways used by airlines during one full day. Actually, I find it nice to see routes emerging on a map as airplanes fly them.
There are of course all kind of websites—I will not mention them here—that let you track aircraft. However, they are very conservative with their data: it is fine to play around on their website, but you cannot have access to their database.
As I discussed my issue with friends and colleagues, I got introduced to Damien who kindly offered me a demo of what they do at his lab and pointed me to rtl-sdr.com for a cheap way to collect my own data.
So I took the plunge and ordered.
First steps on Mac OS
I manage all my non default Unix-like software with homebrew. So the first step would be:
brew install librtlsdr
That is when you can check whether your dongle is alive.
rtl_test -t
The dongle identifies itself as RTL2832U and Rafael Micro R820T1.
So that is good news. My poorly packaged parcel from Shenzhen is not defunct :)
The objective is to get gr-air-modes working, but my first naive approach is not conclusive. So I try another option that I find on github.com:
git clone https://github.com/antirez/dump1090
cd dump1090; make
./dump1090 --interactive --net
The first airplanes appear in an ncurses-like interface
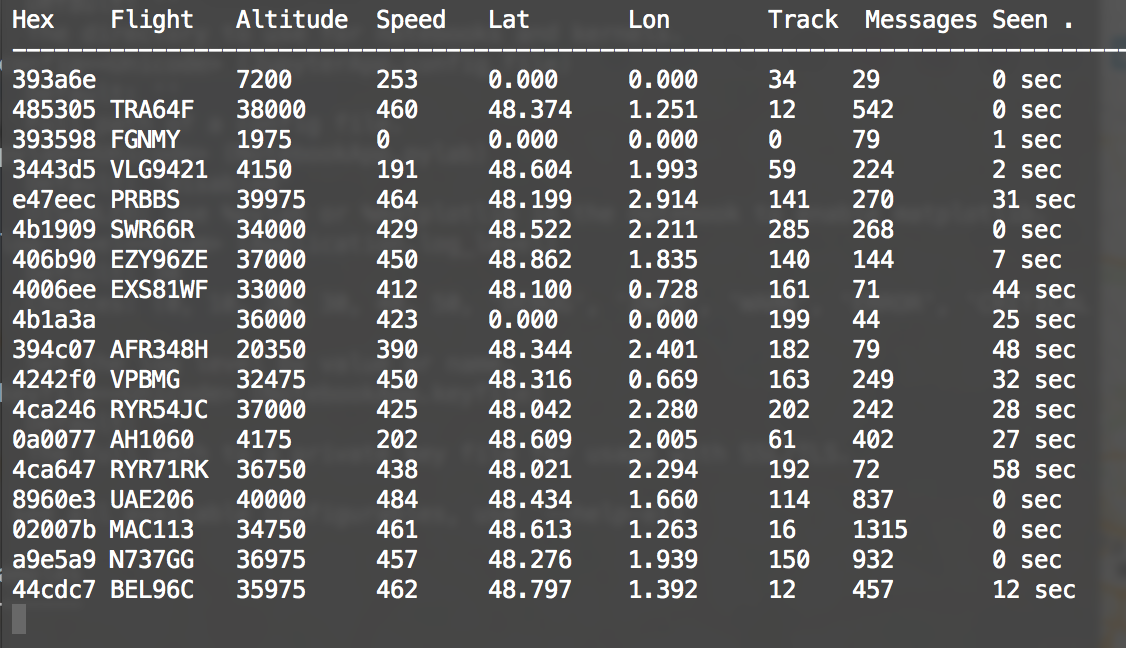
The nice part is that you can even follow what you track on a basic Google Maps frontend, distributed on port 8080.
The gnuradio way
Gnuradio is a framework designed for implementing software-defined radios and signal processing systems. It looks like a sound and reliable option to exploit signals I get with the dongle, so I would prefer to go this way.
Gnuradio is part of the homebrew ecosystem, but the build options depend on what is already installed on your system. So it is important to get things right from the start.
The first necessary Python tools are to be installed as follows. Note that gr-air-modes expects to find Python at the following path /usr/local/bin/python2. I chose to symlink the MacOS default Python 2 executable to this position.
Then after installing pip2:
pip install pyzmq cheetah numpy scipy
These packages are required for the tools we are going to build. They are not explicitly mentioned in the dependencies but cause silent errors hard to detect at the end of a painful process of log exploration.
I would recommend to install the following packages in that order, as the formulas proposed by dholm were a bit weak. Here, gnuradio would be installed as a dependency of gr-osmosdr.
brew install swig boost
brew tap dholm/sdr
brew install --HEAD libosmosdr
brew install libosmo-dsp
brew install gr-osmosdr
As a matter of fact, dholm provides a formula for gr-air-modes but it failed to build on my side and I did not insist.
git clone https://github.com/bistromath/gr-air-modes
cd gr-air-modes; mkdir build; cd build
cmake ..; make; make install
I would recommend the attached patch before building though.
Do not try to skip the make install step as the executable would not find the required Python libraries. Then you can go:
modes_rx -s osmocom -d -r 2.4e6 --kml traffic.kml
The -s osmocom option is to be set for the presented dongle. Then, the default sample rate being to high for the dongle, it is necessary to lower it to 2.4 MS/s. You may get some signals (type 0, type 4, etc.) with the default sample rate, but probably no message of type 17, which is the relevant type for ADS-B.
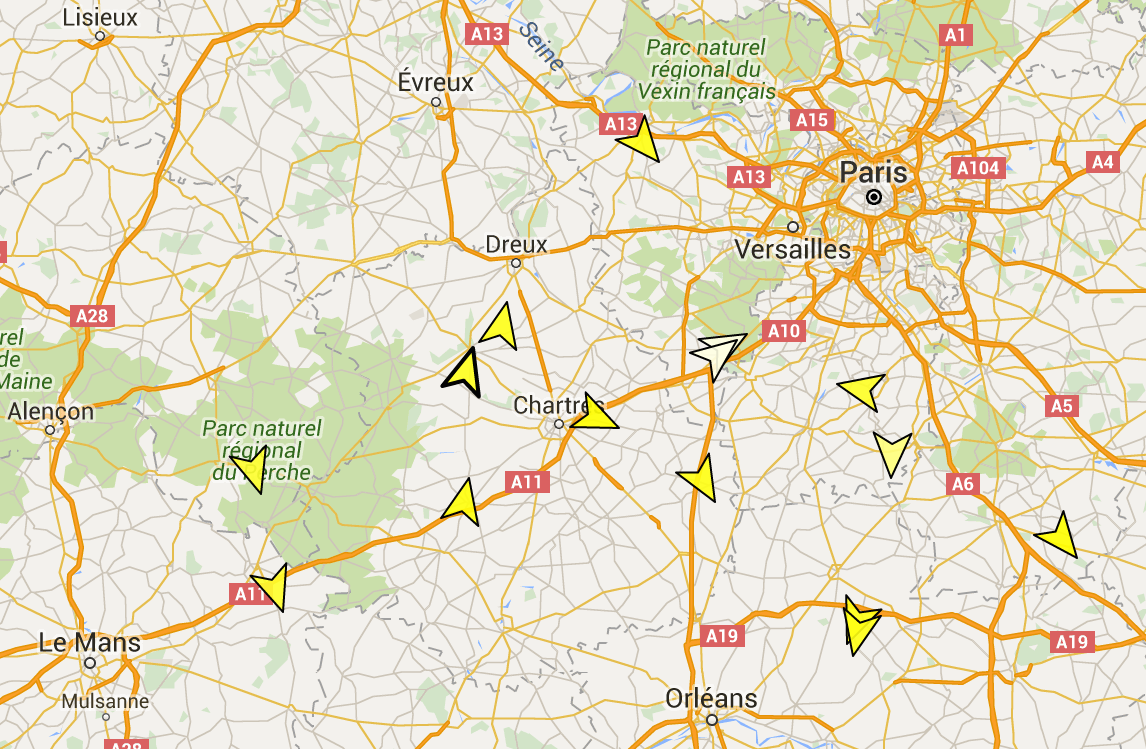
An sqlite file is filled and used to produce a real-time image of the traffic in a kml file. You can view it in Google Earth and set a refresh pace of five seconds for a fair animation of current traffic. The nice part with the Google Earth tracks is that you get a good intuition of different flight levels (cruise, landing, etc.) and get to explore traffic in a 3D manner.
Note: You can play around with the kml file attached here.
Same story, in the Linux world
So I tried again on another laptop I have access to (Ubuntu 14.04 LTS). Having a more clear idea of where to go, it was easier to infer the following line:
sudo aptitude install rtl-sdr gr-air-modes libosmosdr-dev gr-osmosdr
The first issue arose upon the first call to rtl_test -t:
Found 1 device(s):
  0:  Realtek, RTL2838UHIDIR, SN: 00000001

Using device 0: Generic RTL2832U OEM

Kernel driver is active, or device is claimed by second instance of librtlsdr.
In the first case, please either detach or blacklist the kernel module
(dvb_usb_rtl28xxu), or enable automatic detaching at compile time.

usb_claim_interface error -6
Failed to open rtlsdr device #0.
Indeed:
lsmod | grep dvb
dvb_usb_rtl28xxu       36864  1
But after a proper blacklist and reboot:
Found 1 device(s):
  0:  Realtek, RTL2838UHIDIR, SN: 00000001

Using device 0: Generic RTL2832U OEM
Found Rafael Micro R820T tuner
Supported gain values (29): 0.0 0.9 1.4 [truncated]
[R82XX] PLL not locked!
Sampling at 2048000 S/s.
No E4000 tuner found, aborting.
So where are the nice plots now?
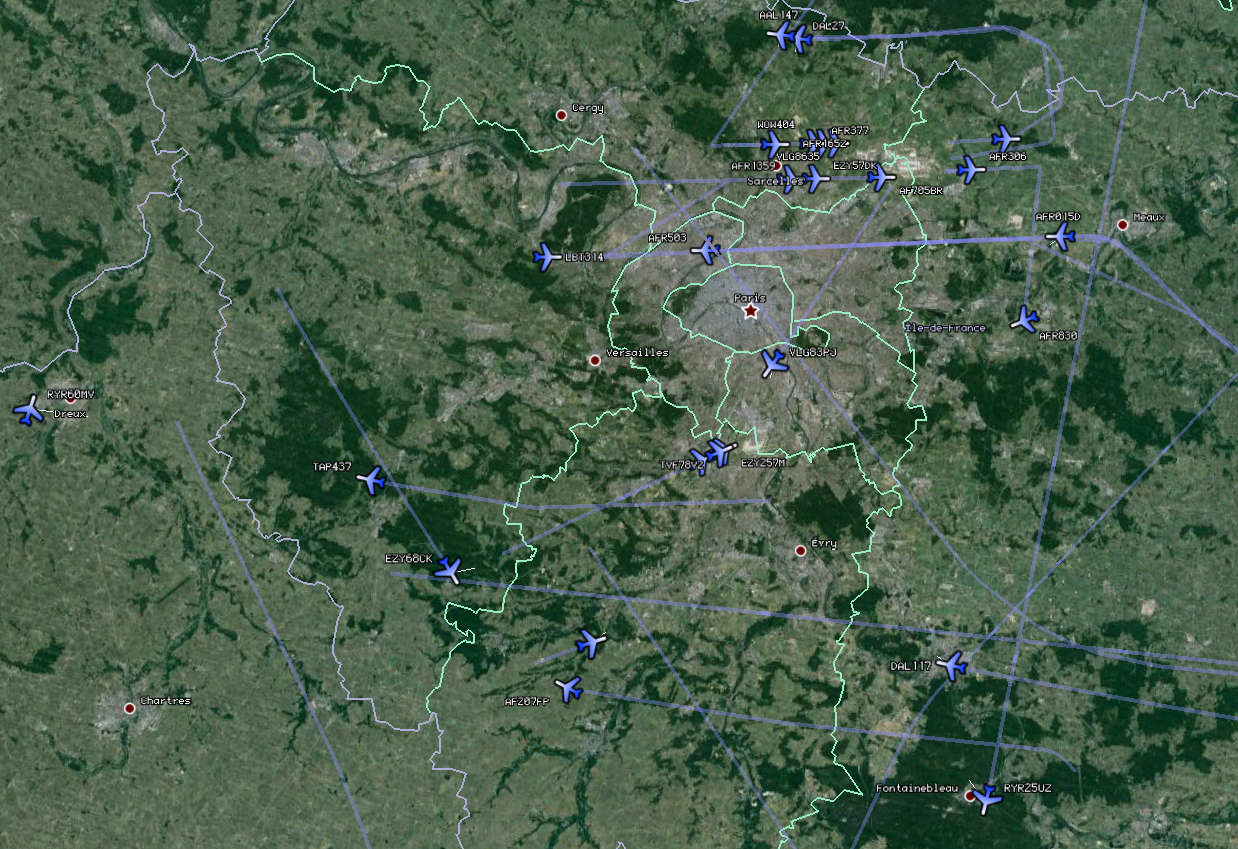
From the roof of a five-storey building, I got to record about one hour of traffic (very battery consuming!) around Paris Orly and Charles de Gaulle airport. I may publish the data later after I am proud of my post-processing!
Play again!
There are many other ways to use the dongle and play with it. A basic utilisation would be to get FM signals and decode them to have them played by the computer.
If your favourite radio broadcasts on 105.1 MHz, then:
- on Mac OS:
brew install sox --with-flac --with-libvorbis
rtl_fm -f 105.1e6 -M wbfm -s 200000 -r 48000 - | play -r 48000 -t s16 -L -c 1 -
- on Linux:
rtl_fm -f 105.1e6 -M wbfm -s 200000 -r 48000 - | aplay -r 48k -f S16_LE
-
The website also mentions the frequency range for this product: 24 – 1766 MHz. ADS-B is broadcast on 1090 MHz, so we are good! ↩
-
https://pip.readthedocs.io/en/stable/installing/#install-pip ↩


